.svg)
.svg)
PRODUCTS

If you’re a Java developer asked to build a live streaming app, the request usually sounds simple: “We just need to go live.” But once you dive in, you realize it’s less about wiring a video feed and more about handling infrastructure at scale.
You’ll need an ingest that can take RTMP or SRT, a pipeline that encodes video on the fly, and a playback URL that works seamlessly across browsers and mobile devices. Then come the harder parts: keeping latency low enough for live chat or sports, scaling when your audience spikes from dozens to thousands, and securing playback so your streams don’t get copied and re-streamed elsewhere.
This is where many teams burn weeks, managing protocols, CDNs, and auth instead of building the actual app experience. In this guide, we’ll walk through how you can build live streaming with Java: from creating streams to broadcasting and playback. And we’ll also show how FastPix APIs take care of the heavy lifting, encoding, scaling, adaptive delivery, and protection, so you get to a production-ready live app faster and with less effort.
Java remains one of the most practical choices for building live video infrastructure, especially if you're building a backend that needs to manage ingest endpoints, API calls, and real-time stream control. Here's why:
1. Cross-platform compatibility: Java’s platform independence makes deployment easier across cloud VMs, containers, or on-premises servers. You can write your streaming logic once and deploy it consistently across environments, no OS-specific build issues.
2. Multithreading and concurrency: Live streaming is inherently parallel: multiple users, simultaneous sessions, constant I/O. Java’s threading model makes it straightforward to handle concurrent broadcasts, stream health checks, and API requests without blocking your server.
3. Mature frameworks for backend APIs: Frameworks like Spring Boot simplify RESTful API development, letting you manage stream creation, status polling, and playback token generation in clean, modular ways. If you're building a control plane for a streaming app, Java gives you strong architectural flexibility.
4. Networking and I/O performance: Libraries like Netty or Apache MINA offer low-level control over networking, useful for building custom ingest logic, websocket-based signaling, or internal RTMP relays if needed. They’re optimized for non-blocking I/O and handle high-throughput data streams efficiently.
5. Broad protocol and encoding support: Java’s ecosystem includes wrappers or bindings for tools like FFmpeg, and libraries that support HLS segmenting, RTMP signaling, or even WebRTC data channels. While most encoding is offloaded to services like FastPix, Java still provides a foundation for custom processing if needed.
Whether you're building a live classroom app or a sports broadcast platform, every live streaming system boils down to five key parts:
A live streaming system isn’t just one server pushing video, it’s a chain of specialized components working together in real time. Here's how each layer fits in:
This example shows how to build REST APIs in Spring Boot for managing live streams, including starting, stopping, fetching status, and listing active sessions. You’ll wire these endpoints to your backend or any compatible live streaming API.
@RestController
@RequestMapping("/streams")
public class StreamController {
// Start a stream
@PostMapping("/start")
public ResponseEntity<Stream> startStream(@RequestBody StreamRequest request) {
// Logic for starting a stream
Stream stream = streamService.startStream(request);
return ResponseEntity.ok(stream);
}
// Stop a stream
@PostMapping("/stop/{streamId}")
public ResponseEntity<Void> stopStream(@PathVariable String streamId) {
// Logic for stopping a stream
streamService.stopStream(streamId);
return ResponseEntity.noContent().build();
}
// Get stream status
@GetMapping("/status/{streamId}")
public ResponseEntity<StreamStatus> getStreamStatus(@PathVariable String streamId) {
StreamStatus status = streamService.getStreamStatus(streamId);
return ResponseEntity.ok(status);
}
// List available streams
@GetMapping("/list")
public ResponseEntity<List<Stream>> listStreams() {
List<Stream> streams = streamService.listStreams();
return ResponseEntity.ok(streams);
}
// Get stream metadata
@GetMapping("/metadata/{streamId}")
public ResponseEntity<StreamMetadata> getStreamMetadata(@PathVariable String streamId) {
StreamMetadata metadata = streamService.getStreamMetadata(streamId);
return ResponseEntity.ok(metadata);
}
}
The backend is the control centre of your live streaming app. It manages stream sessions, handles ingest, and enforces access control. Here’s how to implement each part in Java:
1. Stream management
Create a StreamService class to manage the lifecycle of your streams, from creation to status updates.
@Entity
public class LiveStream {
  @Id
  private String id;
  private String status;
  private int viewerCount;
  private double bitrate;
  // ... timestamps, titles, creator IDs
}
2. Session control
For real-time stream status or viewer-side updates (e.g., chat, reactions):
public boolean preHandle(HttpServletRequest request, HttpServletResponse response, Object handler) {
    String token = extractToken(request);
    return tokenService.isValid(token); // ensure only authorized users start/stop streams
}
3. Ingest handling
To accept video input via RTMP (or SRT), you’ll need a lightweight ingest server.
Java
public void startStream(StreamRequest request) {
// Validate stream key and user auth
if (!authenticate(request.getStreamKey())) {
throw new UnauthorizedException();
}
// Initialize session
Stream stream = new Stream(request.getId(), Status.ACTIVE);
// Start ingest listener (e.g., via Netty channel)
ingestHandler.acceptStream(stream);
// Save to DB
streamRepository.save(stream);
}
Expand this with error handling for disconnections and reconnects.
Java
import io.netty.bootstrap.ServerBootstrap;
import io.netty.channel.Channel;
import io.netty.channel.ChannelHandlerContext;
import io.netty.channel.ChannelInboundHandlerAdapter;
import io.netty.channel.EventLoopGroup;
import io.netty.channel.nio.NioEventLoopGroup;
import io.netty.channel.socket.nio.NioServerSocketChannel;
public class NettyStreamingServer {
public static void main(String[] args) throws InterruptedException {
EventLoopGroup bossGroup = new NioEventLoopGroup(1);
EventLoopGroup workerGroup = new NioEventLoopGroup();
try {
ServerBootstrap bootstrap = new ServerBootstrap();
bootstrap.group(bossGroup, workerGroup)
.channel(NioServerSocketChannel.class)
.childHandler(new ChannelInboundHandlerAdapter() {
@Override
public void channelRead(ChannelHandlerContext ctx, Object msg) {
// Handle incoming stream data here
System.out.println("Received data: " + msg);
ctx.writeAndFlush(msg); // Echoing back the received data
}
});
// Bind to a port and start the server
Channel channel = bootstrap.bind(8080).sync().channel();
channel.closeFuture().sync();
} finally {
bossGroup.shutdownGracefully();
workerGroup.shutdownGracefully();
}
}
}
In this code:
At the core of every live streaming system is a processing pipeline ingest → transcode → deliver. Here’s how to handle it in Java using proven tools like FFmpeg and open-source media servers.
Broadcasters (e.g., OBS, mobile SDKs) push live feeds to your RTMP server. You can:
Once you receive the stream, process it with FFmpeg:
ffmpeg -i rtmp://your-server:1935/live/streamkey \
-c:v libx264 -preset veryfast -f hls output.m3u8
This command pulls the RTMP stream, encodes it using H.264, and outputs HLS-compatible segments + manifest.
To support smooth playback across devices and networks, generate multiple resolutions (e.g., 360p, 720p, 1080p):
ProcessBuilder pb = new ProcessBuilder(
  "ffmpeg", "-i", inputUrl,
  "-map", "0:v", "-b:v:0", "800k", "-s:v:0", "640x360",
  "-map", "0:v", "-b:v:1", "1500k", "-s:v:1", "1280x720",
  "-f", "hls", "-master_pl_name", "master.m3u8", "out_%v.m3u8"
);
pb.start();
You can dynamically configure resolution profiles or apply presets based onstream source quality.
Once transcoded:
Serve these via:
For global delivery, route the segments through a CDN.
If you're looking for lower latency and better packet loss recovery, consider switching from RTMP to SRT (Secure Reliable Transport).
For deeper analysis, see: SRT vs. RTMP: A Comparative Analysis
Once your live streaming app [AD1] is up and running, the next priority is monitoring stream quality not just whether a stream is live, but how well it's performing.
Key health indicators include:
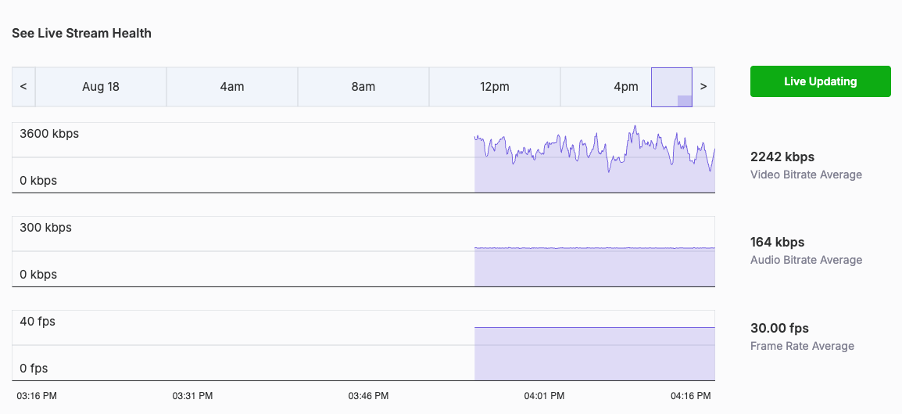
Without visibility into these metrics, your users might face buffering, lag, or drops, and you’ll have no easy way to catch it. That’s why FastPix includes a Live Stream Health dashboard, updated in real time.
For example: August 18, 2025
• Average Video Bitrate: 2242 kbps (ranged from 0 to 3600 kbps between 3:16 PM and 4:16 PM)
• Audio Bitrate: 164 kbps (stable throughout)
• Frame Rate: 30.00 fps (consistent, no major spikes)
This makes it easier to act before your viewers even notice a problem.
When building a live streaming platform, it’s tempting to do everything in-house, especially if you need full control over user experience or app logic. But maintaining real-time video infrastructure at scale is a different game. It’s expensive, time-consuming, and hard to get right without a dedicated ops team.
Here’s a practical breakdown of what’s worth building, and what you should offload to infrastructure platforms like FastPix.
What you should build (in java)
What you should offload
Best approach: Hybrid
You don’t need to choose between building everything or outsourcing everything. A hybrid model works best: Build your product logic in Java. Offload the heavy video infrastructure to FastPix or a comparable platform. This way, your team focuses on features and user experience, not on patching transcoders or scaling media servers.
A better way to build live streaming
You can absolutely build live streaming from scratch, many teams try. But once you go beyond a test stream, the complexity piles up:
Even with the right frameworks, the real work is in stitching everything together, and keeping it running across thousands of sessions, devices, and edge cases. That’s where FastPix comes in.
Instead of managing ingest servers, transcoding pipelines, or CDNs yourself, FastPix gives you everything through a unified API. You control the logic from your Java backend, we handle the infrastructure behind the scenes.
You stay focused on your product logic, FastPix gives you the primitives to:
Check out our live streaming docs and guides to get a better understanding of things.
Advanced streaming protocols, built into FastPix
FastPix supports multiple modern streaming protocols, giving you flexibility to optimize for security, latency, and network conditions, without having to manage the infrastructure yourself. Whether you're streaming from OBS or broadcasting across continents, these protocols are ready to use out of the box.
RTMPS (real-time messaging protocol secure)
FastPix provides secure RTMPS ingest endpoints, ideal for broadcasters using OBS Studio, or vMix. Streams are encrypted end-to-end, ensuring content protection from source to cloud, with no additional configuration needed.
SRT (secure reliable transport)
For low-latency delivery over unpredictable networks, FastPix supports SRT ingest. SRT improves stream reliability by handling jitter, packet loss, and bandwidth variation, making it a strong choice for global or mobile broadcasting scenarios.
Step 1: Obtain an API access token
Important: Save these credentials securely. They are required for API authentication and cannot be retrieved later.
Step 2: Create a live stream
Use the FastPix Live Streaming API to create a new live stream.
Use the /streams endpoint to configure your live stream.
Example POST request:
curl -X POST 'https://api.fastpix.io/v1/live/streams' \
--user {Access Token ID}:{Secret Key} \
-H 'Content-Type: application/json' \
-d '{
"playbackSettings": {
"accessPolicy": "public"
},
"inputMediaSettings": {
"maxResolution": "1080p",
"reconnectWindow": 60,
"mediaPolicy": "public",
"metadata": {
"livestream_name": "fastpix_livestream"
},
"enableDvrMode": false
}
}'
Upon successful request, you’ll receive the following:
Step 3: Start broadcasting
Configure your broadcasting software (e.g., OBS Studio) with the following details:
Start the RTMP session in your broadcasting software. Once the session starts, FastPix will detect the incoming stream and change its status to active.
Step 4: Monitor your stream
FastPix provides real-time updates on your stream via Webhooks. Key events include:
Leverage these events to improve user experience, such as notifying viewers when a stream goes live or ends.
Step 5: Play the live stream
Use the Playback ID to generate the stream playback URL:
Example: https://stream.fastpix.io/{PLAYBACK_ID}.m3u8
Integrate the FastPix player into your application:
HTML
<script src="https://cdn.jsdelivr.net/npm/@fastpix/fp-player"></script>
<fp-player
playbackId="{PLAYBACK_ID}"
metadata-video-title="Live Stream Title"
stream-type="live">
</fp-player>
Test the playback to ensure smooth viewing across devices.
Step 6: Stop broadcasting
To stop the stream, disconnect from the RTMP server using your broadcasting software. If the reconnectWindow expires or the maximum stream duration (8 hours) is reached, the stream will automatically switch to idle or disabled status.
For longer live streams exceeding 8 hours, contact FastPix Support for extended duration options.
Building a live-streaming application involves complex steps, from setting up development environments to integrating APIs, servers, and clients. Key factors like scalability, security, and performance are essential to delivering a seamless user experience.
While building from scratch is challenging, FastPix offers a scalable, cost-effective solution to simplify development. With advanced streaming features and real-time analytics, FastPix can help you deliver a high-quality, secure live-streaming experience with minimal effort. Sign up now and try it yourself. And if you need help, you can always reach us through Contact Us or our Slack community.
Low latency is critical for real-time interactions like gaming and auctions. Best practices include optimizing streaming protocols (e.g., WebRTC), using efficient encoding techniques (e.g., H.264), implementing adaptive bitrate streaming, and deploying edge servers to minimize data transfer delays.
Security measures include implementing token-based authentication, SSL/TLS encryption, and OAuth for user validation. It's also crucial to manage access control via authorization mechanisms, secure API endpoints, and use CDNs with anti-piracy measures like watermarking.
A scalable live-streaming platform comprises components like a streaming server (handles protocols like RTMP, WebRTC), an API layer (manages streams and metadata), a client interface (supports playback and interaction), security systems (encryption, authentication), and performance optimization tools (CDNs, load balancers).
Java's platform independence, multithreading capabilities, and a robust ecosystem of libraries (e.g., Spring Boot, FFmpeg) make it an ideal choice. It supports scalable server architectures and real-time data handling while ensuring compatibility across diverse devices and operating systems.


.avif)

.png)